Welcome to my science blog! From time to time I'll be posting about my numerous scientific projects. I started this blog as a backup for my science journal in the case that I incinerate my laptop amid a disastrous chemistry experiment. It also allows me to share my wonderful discoveries and ideas with people like you. I hope you enjoy it!
In part one of this experiment, I collected, dried, burned, and boiled 40 banana peels to obtain potassium carbonate (K2CO3). Before attempting to isolate pure potassium, I needed to transform this chemical into a different potassium compound: potassium hydroxide (KOH). Here's how it happened:
To start, I created a saturated solution of calcium hydroxide (Ca(OH)2). I then filtered off any excess solute which hadn't been dissolved.
Next, I added the potassium carbonate that I had obtained from banana peels. After thoroughly stirring the mixture, I let the beaker sit overnight as the following reaction took place: K2CO3 + Ca(OH)2 → CaCO3 + 2KOH.
Initially, because the calcium hydroxide solution was saturated, there was no room to dissolve the potassium carbonate. However, as the reaction occurred, the newly formed potassium hydroxide became dissolved while the calcium carbonate was forced out of solution.
When I returned the next morning, I found that the contents of the beaker had separated into two distinct layers. At the bottom lay a white slurry of calcium carbonate crystals—just as expected.
By filtering the beaker's contents, I was able to remove the solid calcium carbonate. This left me with a solution of potassium hydroxide.
The last step was to obtain the KOH's solid form. I started by boiling down the solution until there was nothing but wet crystals. I decided not to boil it dry for fear that the chemical would harden onto and/or corrode the beaker.
Instead, I completed the dehydration process by placing the moist potassium hydroxide in a desiccator bag. A desiccator bag is basically an enclosed space containing a hydroscopic (water absorbing) substance. In my case, I added a larger container of sodium hydroxide. This would act as the desiccant by absorbing the water that evaporated from the potassium hydroxide. At the same time, the sealed bag kept the potassium hydroxide (also hydroscopic) from absorbing new water from the surrounding air.
A few days later, I retrieved the fully dried potassium hydroxide.
Stay tuned for part 3.
Potassium carbonate from banana peels (left) and calcium hydroxide (right).
White calcium carbonate crystals falling out of potassium hydroxide solution.
Solid potassium hydroxide after evaporation and desiccation.
It's common knowledge that bananas are a great source of potassium. What people don't know is that they contain much less of the mineral than many other foods such as beans or potatoes. Nonetheless bananas have a lot. Interestingly, the peel contains roughly 40% or 200 mg of the fruit's potassium content. This is high when you consider the peel's low volume and low weight. Upon learning these facts myself, I began to wonder if raw potassium could be obtained from banana peels. As usual, I asked the internet. To my astonishment, I found very little. The closest I got was a video that showed how to extract a small amount of potassium carbonate (K2CO3). While this wasn't exactly what I was looking for, it got me thinking. What if I could I go beyond potassium carbonate?
My challenge was to devise a series of chemical reactions that would eventually get me to pure potassium. Through research and reasoning, I developed a plan and put it into action. Here is the first installment of my fascinating experiment:
Over the course of two months, I collected peels. I forced my siblings to eat as many bananas as possible. I guess this made them my lab monkeys.
As I received new peels, I placed them across a bamboo pole that I hung in the garage. Within a week or so, they turned brown and dried up.
When I reached 40 dried banana peels, I removed them from their rack and placed them in a small brick oven that I made. Next, I burned them with a blowtorch. This was difficult because the peels did not burn easily. Eventually, I had reduced the pile of peels to a cup of ash.
Back in the lab, I added the banana remains to a large beaker and poured in an equal volume of water. With my butane burner on high, I brought the mixture to a boil. As the liquid bubbled, the potassium, in carbonate form, dissolved in the water while the rest of the ash did not.
Through repeated filtering, I removed the undissolved ash. This left me with a dilute solution of potassium carbonate, among other trace compounds.
By boiling down the solution, I obtained impure potassium carbonate in solid form—the first step toward potassium metal.
Stay tuned for part 2 of this experiment.
It's well known that bananas are high in potassium, the question is, can the potassium be extracted?
To dry the banana peels, I hung them over a bamboo pole in my garage.
While it took quite a long time to burn all 40 banana peels, wielding a blowtorch is never boring.
In preparation for some new experiments, I recently upgraded my lab. Previously, my work surface consisted of a shelf covered with a plastic mat. This didn't work to well when it came to hot glassware or spilled chemicals. To fix this, I decided to buy a few porcelain floor tiles and lay them out side by side. Unlike plastic, they can stand heat and anything else I throw at them.
My new lab setup using porcelain floor tiles.
The tiles can handle spills as well as hot beakers.
I recently synthesized a compound called copper(II) sulfate (CuSO4). While it is commonly sold as an algaecide at hardware stores, I decided to make it myself in order to explore the chemistry. To do so, I combined 5 grams copper wire, 10 ml of 30% hydrogen peroxide (H2O2), and 3 ml of concentrated sulfuric acid (H2SO4). Here's the chemical reaction that took place: Cu + H2SO4 + H2O2→ CuSO4 + 2H2O
After diluting the resulting solution and dividing it into two test tubes, I performed two chemical reactions. In the left test tube, I added a small amount of ammonia (NH3). This formed a complex compound called tetraamminecoppper(II) sulfate, which appeared dark blue. In the right test tube, I added hydrochloric acid (HCl) which reacted with the copper sulfate to form green copper chloride (CuCl2).
Using my previously isolated iodine, along with some diluted ammonia (NH3), I synthesized a tiny bit of nitrogen triiodide (NI3). Due to the major size difference between the nitrogen atom and iodine atoms in the compound, nitrogen triiodide is extremely unstable. As a result, a tap with a stick will cause it to detonate.
To see the demonstration performed on a much larger scale...
Experimentation is an important part of science. Unfortunately, it comes at a cost. That being, it costs money. This is especially true of chemistry experiments in which chemicals can be quite expensive. So while I would love to sit around throwing random chemicals together all day, it is simply not possible if I want to maintain a college fund. When it comes to my projects, I must be wise so as not to waste what I have. I also have to be resourceful with where and how I obtain my chemicals. A good way to do this is to buy them from places like pharmacies or hardware stores. Although they can be hard to find, many chemicals can be obtained much cheaper from commercial products such as cleaners. However, they are typically sold in a diluted form where they are often mixed with other substances. Fortunately, with a little bit of work, they can usually be purified.
Iodine (the 53rd element) is a very interesting chemical. On the periodic table, it lies in the same column as chlorine which makes it quite reactive. Despite being somewhat dangerous, it has many uses in the medical industry. While I would love to explore its chemistry, it costs nearly $30 per ounce. Plus, you often need to get a license just to buy it. Luckily for me, I can get it through the black market, aka CVS pharmacy. Yes, iodine is commonly found in antiseptics where it is usually called "tincture of iodine." These products contain a small percentage of pure iodine along with potassium iodide (KI) dissolved in water and/or alcohol. For me, this form of iodine is only useful if I want to keep myself from getting an infection. To make it suitable for chemistry experiments, I would have to purify it.
As I said before, the amount of pure iodine in antiseptics is very small. To obtain a useful quantity of the chemical, I knew I would need to isolate it from the larger portion of potassium iodide. To do that, I added an equal amount hydrochloric acid (HCl). The acid removed the potassium ion from the potassium iodide and replaced it with a hydrogen ion (HI). To separate the iodine from the hydrogen, I then mixed in a solution of dilute hydrogen peroxide (H2O2) which I also got from the drug store. The hydrogen peroxide molecules oxidized the hydrogen atoms whereupon water (H2O) was created. As for the iodine, it was now free. Here are the two reactions that occurred: 1. KI + HCl → KCl + HI 2. 2HI + H2O2→ 2H2O + I2 Because the iodine by itself was no longer soluble in water, it precipitated out in solid form. After all of it had gathered at the bottom of my beaker, I poured it over a filter and washed it with water. This left me with a black sludge of impure iodine.
To further refine my iodine, I relied on one of its fascinating properties. While most substances melt when they are heated, iodine sublimates. That means it goes from a solid state directly to a gaseous state. To take advantage of this, I dropped my globs of iodine in a beaker and placed it over my burner. As it began to heat, I covered the beaker with a watch glass to contain any gases that might escape. It wasn't long before a dark purple cloud of sublimated iodine appeared inside the beaker. As the gas thickened, I poured some cold water on top of the watch glass. This would cause the gas near the top of the beaker to cool and condense. Unlike hot water vapor, which becomes liquid when cooled, iodine gas becomes a solid. In doing so, it rapidly forms into crystals. In my case, the sharp crystals that appeared were astounding. When the iodine at the bottom of the beaker had disappeared, I turned off the heat. Once everything had cooled, I removed the watch glass which had been covered in a silvery layer of iodine. After scraping all of the crystals into a glass vial, I had my purified product.
Here is the heated beaker containing sublimated iodine gas which cooled near the top to form tiny crystals.
My impure iodine slurry.
Here's the crust of pure iodine that formed beneath the watch glass.
Mercury is an awesome element. In addition to being a liquid at below room temperature, it has an extremely high density and surface tension. In fact, a solid steel ball placed in it will actually float. Unfortunately, mercury is also quite toxic. This, coupled with its high cost, means that I probably won't be getting my hands on it. However, it doesn't mean that there isn't an alternative.
If you've read my previous posts, you might recognize the element gallium. Gallium has a relatively low melting point of 86 ℉. While that's low enough for it to melt in my hand, the metal solidifies rather quickly. Plus, gallium forms a pesky oxide layer which prevents it from flowing freely. Some alkali metals such as cesium also have low melting points. However, they are extremely reactive to say the least. There are a few other low-melting metals but they are either too dangerous or too expensive. Fortunately, pure metals aren't the only option.
A while back, I explored an alloy of gallium and aluminum. The alloy was interesting because it took on different characteristics than its two components. In general, alloys are useful because they have properties that aren't found in pure metals. For example, bronze was important because, unlike copper or tin, it was both strong and resistant to corrosion. Similarly, many alloys have lower melting points than the metals that form them. These alloys are often used as solders. But is there a low-melting alloy to replace mercury? The answer is yes.
The alloy is called Galinstan. Its name is derived from the three metals that are used to make it: gallium, indium, and stannum (the latin word for tin). Galinstan's melting point is about -2 ℉. It is also nontoxic, which makes it a fantastic replacement for mercury in many devices such as thermometers. The fact that it is safe also means it can be explored by people like me. So after buying the necessary materials online, I went ahead and made the alloy for myself. To do so, I melted down 7 grams of gallium (86 ℉), 2 grams of indium (314 ℉), and 1 gram of tin (450 ℉). When the liquid metal cooled, I removed any unalloyed bits which had solidified. After purifying the alloy, I had my liquid Galinstan metal.
If you noticed, all three of the metals that I used had relatively high melting points. So how did their combined melting point end up so much lower? To figure this out, we must understand what determines a substance's melting point. To do that, let's first look at the concept of temperature itself. Temperature is actually a measure of kinetic energy. On the molecular level, kinetic energy is the constant movement or "jigglyness" of the atoms in a substance. So when something is getting hot, it means that the atoms inside are moving around more. And when a substance's atoms are moving around more, that substance begins to move around more as well. Eventually, that substance begins to melt, or in the case of a liquid, it evaporates. The important thing to note here is that different types of substances require different amounts of energy in order to melt or evaporate. This amount of energy is often determined by the molecular structure of the substance. So in the case of Galinstan, its molecular structure simply requires minimal energy to melt. Thus, it is able to remain a liquid at low temperatures.
Here you can see the shiny, mercury-like globs of my Galinstan alloy.
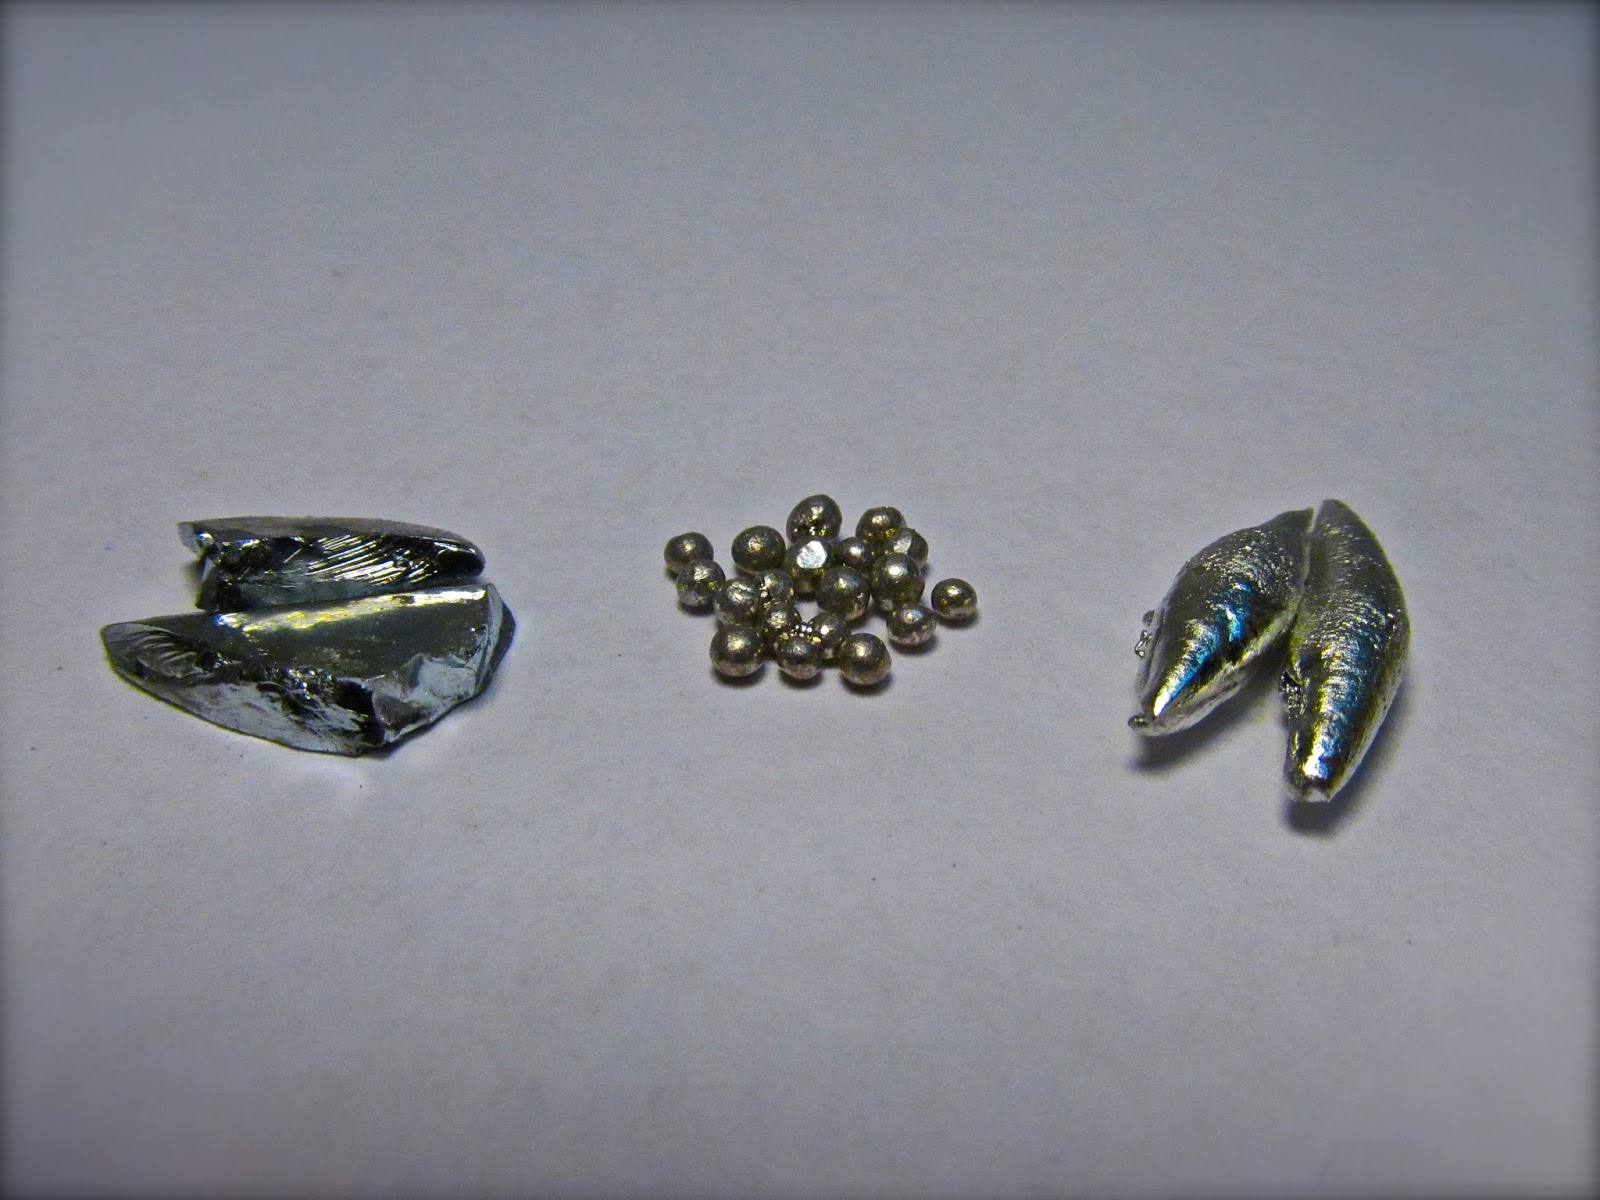
Here are samples of my gallium, indium, and tin (from left to right).
In my last experiment, I created a salt solution by combining hydrochloric acid and sodium hydroxide. Out of curiosity, I decided to let the solution evaporate with the hope that crystals would form. Sure enough, after a few days, they did.
After filtering the solution and letting it evaporate on a paper plate, it formed beautiful crystals of table salt.
I recently conducted another simple, yet fascinating chemical reaction. In doing so, I relied on two chemicals: hydrochloric acid (HCl) and sodium hydroxide (NaOH). Dilute hydrochloric acid, often called muriatic acid, is commonly sold as a powerful cleaning agent. Even in low concentrations it has the ability to strip cement as well dissolve most metals. In higher concentrations it represents a scary, yet useful lab chemical. Similarly, sodium hydroxide, also known as lye, has a variety of uses. As you might know, lye is an important component of soap, although its concentration is usually quite low. In its pure form, sodium hydroxide can destroy most metals as well as glass. Essentially, both hydrochloric acid and sodium hydroxide are extremely corrosive substances. So what dangerous purpose would I be using them for? Well, you'll see soon enough.
To start, I did some calculations to figure out how much of each substance I would need. I then weighed out granules of white sodium hydroxide and added them to a glass jar. I used a jelly jar so as not to harm one of my precious beakers. Next, I measured out my hydrochloric acid using a graduated cylinder. With my camera ready and at a good distance away, I poured the acid into the jar. As the chemicals reacted, they began to froth and boil. However, after about ten seconds, the mixture calmed down. The reaction's exothermic nature had caused the jar to become quite hot. The resulting product was a clear-white solution with a syrupy consistency. The question was, what was it chemically?
Considering the destructive nature of the chemicals used, you might expect this new concoction to dissolve diamonds. Yet, the two substances that I had synthesized were far more sinister. Behold sodium chloride (NaCl) and dihydrogen monoxide (H2O)! Wait what? Table salt and water? Yep, here's the chemical equation to prove it: HCl + NaOH → NaCl + H2O. See how that works?
This simple reaction represents a fundamental area of chemistry. As is implied, hydrochloric acid is an acid. Sodium hydroxide on the other hand is a base. As I pointed out before, both can be extremely corrosive. However, they operate in completely different ways. In other words, they represent opposite ends of the spectrum. In fact, they sit on opposing sides of the pH scale. At the same time, acids and bases are sort of like chemical counterparts. When they come together, they neutralize each other. And, in the majority of cases, they are converted into salt and water. It is important to keep in mind that salt is a general term for any ionic compound that is formed by the reaction of an acid and a base. However, in this reaction, the resulting salt is the same one that you put on your french fries. In summary, I was able to take two chemicals, both of which can dissolve metal, and transform them into nothing but simple salt water.
In order to make sure the solution was truly neutral, I tested it with litmus paper and adjusted it accordingly.
To learn more about the concept of acid/base neutralization...
If you have ever looked through a chemistry textbook, chances are you are familiar with a certain image: that of a nerdy kid wearing nerdy goggles who is examining beakers full of colorful liquid. As if glassware filled with water and food coloring is supposed to inspire you in your battle with stoichiometry. While the scene may be cliche, it illustrates something significant. It may surprise you to know that colors represent a big part of chemistry. If you remember, colors are just different wavelengths of light. You might also recall that different substances reflect some wavelengths but not others. For example, a red apple reflects red light while absorbing most other colors. This is because the molecular structure of the apple's skin allows the non-red wavelengths to pass into it. Essentially, a chemical's color is a literal reflection of its molecular construction. This makes color a useful tool when you consider that chemistry is the study of matter.
As usual, I performed an experiment that related to this concept. To start, I added some water to the bottom of a large flask. I then stirred in a small amount of potassium permanganate crystals (KMnO4). When the crystals dissolved, I had a dark purple solution. Next, I prepared a second solution of hydrogen peroxide (H2O2) and sulfuric acid (H2SO4). With my camera ready, I began pouring the mixture into the large flask. As the two liquids met, something astonishing happened. Within seconds, the purple color of the first solution had disappeared. The contents of the flask had gone from dark purple to crystal clear in an instant.
The speed at which the reaction took place gave me an idea. I wanted to see what would happen if I reversed the positions of two liquids. So after adding the hydrogen peroxide and sulfuric acid to the big flask, I made another solution of potassium permanganate in a separate beaker. Now came the test. I held the beaker above the flask and slowly poured out its colorful contents. As I did, something magical happened. Upon landing in the flask, the purple solution became invisible. Even after emptying the entire beaker, the liquid in the flask remained as clear as water. The effect was simple yet quite satisfying.
Surprisingly, both of these demonstrations have a simple explanation. When the two liquids met, a chemical reaction occurred. While I won't go into detail, the hydrogen peroxide and sulfuric acid caused the potassium permanganate to break apart and form smaller pieces. But how does this explain the color change? Well, as a mentioned before, different substances reflect different colors. In the case of the potassium permanganate, it was reflecting purple light. However, thanks to the chemical reaction, it was transformed into different substances. And unlike the potassium permanganate, these substances did not reflect purple light. In fact, they barely reflected any light, which is why they appeared colorless.
The demonstration's simple yet satisfying nature makes it one of my favorites.
In my 10th post, I talked about some of the incredible properties of gallium (the 31st element). Recently, I decided to check out another one of gallium's unique aspects. This time, I wanted to see how it would interact with a similar metal: aluminum. As you probably know, when two metals come together they form an alloy. The interesting thing about alloys is that they often take on different characteristics than their composite metals. In this experiment, I created and explored an alloy of gallium and aluminum. The results were pretty fascinating.
To start, I cut out two identical squares of aluminum sheet metal. I then positioned one of the sections above my butane burner and began heating it. As it warmed, I selected a few small bits of gallium. When the aluminum became hot enough (over 86 ℉), I placed the pieces of gallium on top of it. After a little while, the gallium chunks melted into shiny globs. I then used a toothpick to spread the molten metal across the aluminum. As minutes went by, the gallium started to disappear. The silver liquid simply sank right into the aluminum. When the gallium was gone, I turned off the heat and removed the sheet metal. Now came the test.
In order to understand what was different about my newly-created alloy, I first had to examine my aluminum control sample. I bent it around a few times and found it to be rather sturdy. Next, I picked up the sample that I had previously treated with gallium. Without trying very hard, I was able to rip the piece straight in half. I then continued to tear up the subsequent sections as if they were made of cardboard. The once-tough sheet metal felt like a cereal box. The sensation was freaky.
Similar to most chemistry experiments, the explanation for what happened here can be found by looking at the chemicals involved. The first thing to keep in mind is that gallium and aluminum lie in the same column of the periodic table. Thus, it is no surprise that they share some traits. One of these being that both chemicals have fairly similar molecular structures. It is partly because of this that gallium atoms are able to diffuse into aluminum's molecular lattice. However, while gallium atoms can take their place among aluminum, they don't necessarily act the same. As they infiltrate the aluminum, the gallium atoms greatly weaken its structural integrity. This is exactly why I was able to tear apart the metal so easily. It is also the reason why gallium is not allowed on airplanes.
Here you can see the tiny portions of liquid gallium as they infiltrate a heated piece of aluminum sheet metal.
After exposing it to the gallium, I was able to effortlessly tear apart the aluminum as if it were cardboard.
Another version of the demonstration using an aluminum soda can...
What if I told you that you could safely stick your fingers in molten lead (621 ℉). Or that you can submerge your hand in liquid nitrogen (-321 ℉) without being harmed. Better yet, what if I said that water can flow uphill? Remarkably, all of these things are possible thanks to a certain scientific concept. That concept: force fields. While they can't deflect giant laser beams, force fields actually exist in real life. However, they go by a different scientific name: Leidenfrost effects. Discovered in 1756 by Johann Gottlob Leidenfrost, the Leidenfrost effect is a little-known phenomenon of science. Since I discovered it about a week ago, the concept has fascinated me. My interest in it eventually led me to perform some experiments. Seeing as I didn't have any molten metal or liquid nitrogen to play with, I had to settle for some simpler demonstrations. My first experiment involved dropping a red-hot steel ball into water. While the procedure was easy, it took a couple tries to film it right. When I did get a good shot, the results were amazing.
Upon examining my amateur slow-motion footage, I noticed something peculiar about the metal ball as it entered the water. The sphere became surrounded by a bubble. As you have probably seen, water evaporates when it comes in contact with a heated surface. However, if a surface is extremely hot, things get a little strange. Sometimes, if a liquid is vaporizing faster than it can escape, the gas builds up and forms a barrier. The thing to note here is that gases can't transfer heat nearly as well as liquids can. It is for this reason that the gas bubble slows down further evaporation. This is the essential idea behind the Leidenfrost effect.
In my second experiment I did something quite different. To show the Leidenfrost effect once again, I started by heating an empty frying pan. As it sat over the stove flame, I used a small pipette to shoot water at it. Initially, the water quickly boiled away as expected. However, after about five minutes, something very interesting happened. The water drops from the pipette stopped vaporizing. Upon landing on the skillet, each droplet began to skitter around wildly. While they did evaporate eventually, the droplets seemed impervious to the pan's extreme heat.
Similar to the steel ball, the metal pan was beyond hot enough to vaporize any water that touched it. Surprisingly, this is exactly what kept the pipette drops around for so long. As soon as the droplets hit the pan, their underside instantly evaporated. Due to the fact that this happened so quickly, their own vapor became trapped beneath them. And just like before, their vapor insulated them from the hot skillet. As a result, they were able to ride around on a cushion of air like miniature hovercrafts. To see more Leidenfrost magic, click the links below!
Although the photo isn't great, you can clearly see the force-field-like bubble surrounding the heated steel ball.
Despite the pan's extreme heat, the water droplets continued to skitter around thanks to the Leidenfrost effect.
For more information about the amazing Leidenfrost effect...
If you think about it, magic tricks only work when their observers don't know what is really happening. Likewise, in science, our observations can seem magical because we can't explain them. In my latest experiment, I experienced this exact feeling of wonder. My procedure was relatively simple. I took a small beaker of sugar (C12H22O11) and stirred in some sulfuric acid (H2SO4). This caused the mixture to turn black and start bubbling. After a few minutes, the concoction began to expand while releasing lots of steam. When it stopped growing, the sponge-like substance became rock hard. The reaction also let out enough heat to melt the plastic beneath the aluminum foil. The results were certainly peculiar.
Similar to most of my experiments, I discovered this one on the internet. To my surprise, I had a hard time finding an explanation for it. Eventually I figured it out. In the reaction, the sulfuric acid broke down the sugar into two parts: carbon and water. The water was given off in the form of steam leaving the carbon behind. This process is called a dehydration reaction. It caused the carbon to take on an entirely different structure similar to that of solid graphite. The expansion effect happened because of air pockets that formed. As for the heat, it was simply the energy released from the sugar. All in all, the experiment was quite fascinating.
Here in Northern New Jersey, my family and I have recently experienced quite the cold snap. To take advantage of the near-negative temperatures, I decided to perform a certain experiment. I wanted to see if I could "flash freeze" some water simply by throwing it into the air. To find out, I took a cup of cold H2O and splashed it out my window. Much to my surprise, nothing happened. Upon doing some quick research, I read that the demonstration only worked with boiling water. While this seemed counterintuitive, I decided to go ahead and try it out.
I set up my camera and began heating a small pot of water. When the water reached a boil, I marched out the door and into the sub-zero weather. Gripping the saucepan with my oven mitts, I threw its contents into the icy air. The result was astonishing. As the water flew from the pot, it became surrounded by a giant, steamy cloud. As the cloud expanded, it produced a shower of what looked like snow. While I initially believed that the hot liquid had frozen, I started to have my doubts. I also couldn't understand why the cold water had behaved differently.
In a quest for answers, I returned to the internet. Through reading and reasoning, I was able figure everything out. Contrary to popular belief, water will only flash freeze when the air is around -40 degrees Fahrenheit. Seeing as it wasn't that frigid, it is more likely that the water evaporated. This makes sense because boiling water is already close to evaporating and does so fastest in cold dry air.
While this did explain the foggy cloud, I still couldn't account for the snow-like dust that had also appeared. To work that part out, I decided to take a closer look. In doing so, I noticed that each white spec left behind a trail of vapor. Almost like a comet. This idea led me to believe that the particles were actually evaporating drops of water that only appeared white, because their surface was constantly vaporizing. Analysis aside, I enjoyed exploring the science firsthand.
Even though the boiling water never froze like I had hoped, the experiment turned out to be a very interesting.
If you have ever stared into a fireplace or campfire chances are you have pondered a particular question. That being, what is fire? Technically, most fire is a plasma-like portion of semi-ionized gas. However, what most people really want to know is what it means for something to burn? The answer is somewhat simple. Burning, or combustion, happens when a substance has enough energy to oxidize. In other words, materials burn because they want to bond with oxygen. I explored this interesting concept in an experiment that I performed recently. To start, I filled two identical flasks with vinegar (dilute acetic acid [C2H4O2]) and baking soda (sodium bicarbonate [NaHCO3]). The reaction that took place produced a nice amount of carbon dioxide (CO2). After corking the containers, I was ready to perform two tests. For the first part, I simply lit a large match and held it over one of the flasks. Instantly, it was snuffed out. In my second test, I ignited a strip of magnesium metal and suspended it within the other flask of gas. Unlike the wooden match, the magnesium continued to blaze brightly until it was completely consumed. To explain these differing results, I looked at the science.
In the case of the lit match, I knew that it ran out of oxygen upon entering the CO2. The question was, why didn't the same thing happen to the magnesium? The answer lies in the fact that magnesium burns with an extremely high amount of energy. In other words, the metal has a very powerful attraction to oxygen and will try incredibly hard to bond with it. It is because of this extreme desire that magnesium is able to rip oxygen atoms straight off of other molecules. Thus, I concluded that, when placed in the flask, the burning magnesium obtained all of its oxygen from the carbon dioxide. I found that to be particularly remarkable.
Even while in carbon dioxide, the magnesium metal burned in a spectacularly bright fashion.
To watch the reaction between magnesium and solid carbon dioxide (dry ice)...
In the spirit of the holiday season, I decided that I ought to perform a festive chemistry experiment. The question was, what should I do? My answer: incinerate a peppermint candy cane in a test tube of molten potassium chlorate (KClO3). What else? To start, I unwrapped my candy cane and ate the top portion. Next, I scooped a small amount of potassium chlorate powder into a test tube. This would act as my oxidizer. After holding the tube over my butane burner, I was able to melt the powder into its more reactive liquid form. With the test tube securely in place, I dropped the half-eaten candy cane inside.
As soon as the spiraled segment entered the liquid, there was a miniature explosion that caused it to shoot out like a mortar shell. Even though the piece of candy was on fire, I still had my potassium chlorate and wasted no time adding another candy cane. This time, the clump of peppermint fuel stayed in place long enough to be completely consumed. At its peak, the sugary inferno resembled a propane torch on full blast. While the pyrotechnics were pretty cool, the best part of the reaction was its wonderful smell of burnt caramel. Merry Christmas!
The vigorous firestorm produced by this reaction shows how much energy is in a simple candy cane.
Of the many fascinating chemicals that I have recently obtained, I have a favorite. It is a shiny low-melting metal called gallium. While you may not have heard of it, gallium is actually the 31st element on the periodic table, located just below aluminum. It has quite a few interesting traits, some of which I plan to explore in future experiments. Gallium is best known for its relatively low melting point of 86 degrees Fahrenheit. This, along with the fact that it is also non-toxic, makes it a great substitute for mercury. In general, liquid metals have many unique properties. Unfortunately, because most metals have extremely hot liquid states, they can't react with other fluids without instantly solidifying. This makes gallium useful in examples of aqueous chemistry such as my most recent experiment.
I started by placing a small piece of my gallium into a beaker with some water. After heating the beaker for a short time, the metal melted into an irregular blob. Next, I added a few drops of concentrated sulfuric acid (H2SO4). Within seconds, the liquid gallium became a perfect sphere. This was because the newly formed gallium sulfate had a higher surface tension than the metal by itself. In the second part of the experiment, I reversed this effect by adding a small amount potassium permanganate (KMnO4). Just like the sulfuric acid, the permanganate changed the chemical composition of the gallium. However, instead of increasing the metal's surface tension, it lowered it. This caused the gallium to spread out like oil slick. The interesting part came when I poured in more sulfuric acid. This reversed the reaction once again as it caused the layer of gallium to form beads.
Ideally, this is supposed to be an oscillating reaction in which both chemicals are balanced. In this situation, the gallium would constantly contract and relax as the chemicals on its surface changed places. This unique behavior of the gallium is why the demonstration is often called the "gallium beating heart experiment." The process is significant because it shows that by changing a liquid's chemical makeup, you can change its surface tension and thus, the way it behaves.
While the experiment didn't go entirely as planned, the gallium behaved in some interesting ways.
To see the true gallium beating heart experiment...
I recently received a ton of awesome chemistry supplies for my 16th birthday. Along with items such as a butane burner and periodic table poster, I was given my first batch of lab-grade chemicals. Until then, I obtained most substances from the pharmacy or hardware store which greatly limited what I could do. Thanks to my new materials, I have many fascinating projects planned for the upcoming months. For my first experiment, I wanted to start things off with a bang. Literally.
I began by pouring out a small amount of potassium permanganate (KMnO4), which is an oxidizer. I then added a little bit of glycerin (C3H8O3) as my fuel. While the two chemicals would have reacted eventually, I decided to speed things up by adding a few drops of water. Within seconds, the tiny pile went from a smolder to a miniature flash-bang explosion. It was pretty crazy.
Because the reaction involved the burning of glycerin, which contains hydrogen and carbon, it can sort of be considered a form of combustion. Thus, it is no surprise that with the presence of the oxygen-rich potassium permanganate, the result would be explosive. Caution: this reaction is unpredictable in nature and therefore should only be attempted on a small scale with extreme care.
Considering the small quantity of chemicals used, the reaction was quite vigorous.
I was eating a handful of half-metled Hershey Kisses when I found myself struggling to fully unwrap them. Then a thought occurred to me: what if I could remove the wrapping-foil using science? After pondering the question, I came up with an idea. I grabbed a small beaker and headed outside. There I filled the beaker with some hydrochloric acid (HCl) and a little bit of water. With my camera ready, I dropped a fully-foiled Hershey Kiss into the beaker and began to wait. It wasn't long before the shiny candy was writhing and bubbling. Eventually, all of the aluminum surrounding the chocolate had disintegrated into almost nothing.
The science behind what happened was simple. The hydrochloric acid ripped off the aluminum atoms forming aluminum chloride (AlCl3) and leftover hydrogen gas (H2). The hydrogen is what formed the bubbles which means that they were actually quite flammable. In the end, I was left with what seemed to be a perfectly unwrapped piece of milk chocolate. However, the HCl and aluminum that it absorbed probably made it extremely toxic.
After a few minutes, the wrapping-foil surrounding the chocolate completely dissolved in the HCl.
I was in the pharmacy the other day when I saw something neat that I didn't think still existed: Pepto-Bismol. For those who don't know, Pepto-Bismol is a digestive medicine that has been around for quite a long time. The reason I was interested in it was not because I had a terrible stomach ache, but because of the drug's chemical makeup. I had heard a while back that the medicine contained bismuth as part of its active ingredient bismuth subsalicylate (C7H5BiO4). Bismuth is a non-toxic heavy metal that resembles lead in a lot of ways. If you saw my first post about diamagnetic levitation, you'll also know that it weakly repels strong magnets. Anyway, I decided to buy a small pack of Pepto-Bismol tablets with the hope of somehow extracting bismuth from them. After going online and finding the correct procedure, I learned that my hope could easily become a reality.
I started by crushing up the majority of the bright pink tablets in my mortar and pestle. I then placed the neon powder in a beaker and added some diluted hydrochloric acid (HCl). It took a while, but I eventually dissolved the Pepto-Bismol into the hydrochloric acid with a good amount of stirring. After filtering out any leftover solids, I placed a strip of aluminum into the pale pink solution and let it sit for a while. What happened was that the chlorine ions from the HCl let go of the bismuth ions and bonded with the aluminum ones instead. This left the bismuth to simply clump together and form a gray precipitate. I was then able to collect these bismuth particles using a coffee filter. After allowing the powder to dry and putting it into a steel ladle, I attempted to melt it over our stovetop.
Sadly, I never got the shiny silver liquid that I was looking for. Instead the dark dust simply fused together and turned mustard yellow. After thinking about it, I would say that there were most likely too many impurities. As far as the yellow color goes, I suspect that this was due to the oxidation of either the bismuth or the leftover aluminum. I may never know.
Bright pink Pepto-Bismol digestive medicine containing minor amounts of the element bismuth.
Precipitation of solid bismuth out of HCl using aluminum.
Pure bismuth metal from my "Diamagnetic Levitation" project.